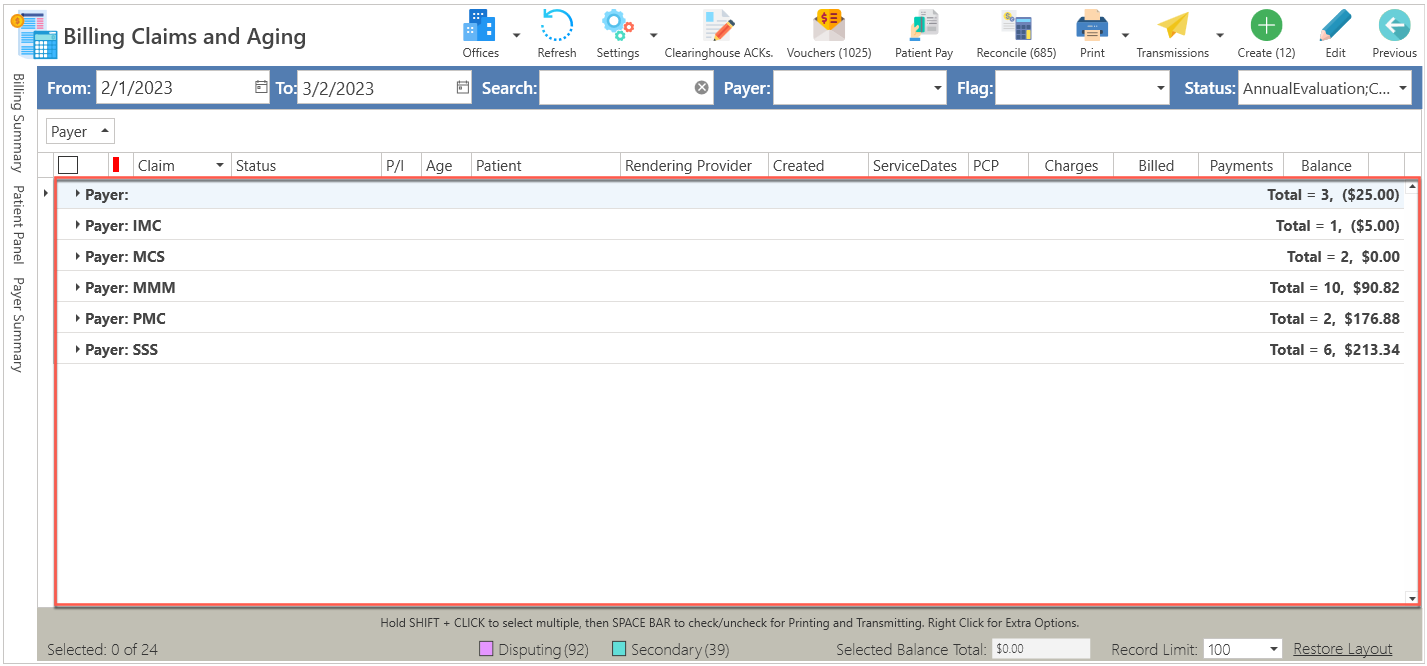
Description
In this section, the user will be able to work with all the claims of the office or center. The user will be able to perform multiple functions such as; create a secondary claim, modify the patient's medical plan coverage, verify medical plan eligibility, check the patient's billing history, among others.

Access
Through the Main Menu
- On the main screen, press the Billing button.
- On the main screen, click on the QuickLinks text located at the top of the screen and select the Billing option.
- On the Patient Details screen, click on the Billing button located at the top of the screen and select the Go To Billing option.
- On the Appointments screen, press the Billing button located at the top of the screen and select the Go To Billing option.
Columns
- Flag: Identifier based on colors, for the claim.
- Note: This identifier is added by right clicking on the claim and selecting the Flag with Color option.
- Note: This identifier is added by right clicking on the claim and selecting the Flag with Color option.
- Claim: Number that identifies the claim.
- Status: Displays the status of the claim. Some statuses are set automatically. The user can also change the status manually when working with the claim, as needed.
- P/I: Displays whether the claim is professional or institutional.
- Age: Display the number of days of claims.
- Patient: Displays the name of the patient, to whom the claim belongs.
- Rendering Provider: Displays the name of the provider, who provided the claim service.
- Created: Displays the date, when the claim was created.
- Services Dates: Displays the date of service of the claim.
- PCP: Identifies whether the claim was made by the patient's primary provider.
- Charges: Total service charges.
- Billed: Total cost per service to be billed.
- Payments: Total payments made by the patient and the insurer to the claim.
- Balance: Total outstanding claim balance.
 : When pressed, it deletes the selected claim but returns the unbilled encounter information to the Create New Claim screen in the Unbilled Clinical Encounter section.
- Note: If the user does not want the unbilled encounter information to continue to appear, he/she should go to the Create New Claim screen, in the section called Unbilled Clinical Encounter, and press the right mouse button and select the Ignore / Mask as processed option
- Contract Number: Displays the patient's medical plan contract number.
- Ages Days: Displays the number of days of claims.
- Billing Provider: Displays the name of the supplier, for which the invoice is being billed.
By right-clicking on the claims table:
The following options will be displayed: 
- Refresh: When pressed, the information will be updated to the most recent.
- Copy to Clipboard: Allows you to copy the selected claim to another application.
- Print: Print the claims report.
- Edit: Allows to edit the selected claim.
- Clear Selected: By selecting this option, all claims, which are selected, are deleted.
- Collapse All: When selected, only the insurance companies will be displayed on the screen.
- Expand All: When selected, all claims will be displayed on the screen.
- Show Column Chooser: The screen for the selection of columns that the user wishes to view on the main billing screen will be displayed.
Current Item: These options only apply to the claim that is selected.
- Flag With Color: Selecting this option allows you to select a color to the claim, which is selected.

- Create Secondary Claim: Selecting this option will create an invoice completely the same as the previous one, with the only difference that it will be assigned to the secondary plan.
- Modify Patient Coverage: Selecting this option allows the user to modify the patient's medical plan coverage.
- Check Payment Eligibility: Selecting this option allows the patient's eligibility verification to be displayed.
- Reset Insurance Payer: Clicking this option on a patient's claim places the original medical plan information they had when the claim originated.
- View Patient History: Pressing this option on a patient's claim displays the claims history screen for the selected patient.
- Delete: Selecting this option will delete the selected claim. *(The claim will go to the Create New Claim(s) screen, in the section called Unbilled Clinical Encounters.)
Note: If you do not want the claim to be displayed on the Create New Claim screen in the Unbilled Clinical Encounters section. Then you must go to that screen, select it and right click on it and then choose the option called Ignore / Mark as processed.
For Selected Items
- Change Status: Selecting this option allows you to change the status of claims.
- Delete Selected: Selecting this option allows you to delete the selected claim.